
Logging into the Orion Administration User Interface
You’ll use the administration UI to configure your customer licenses and manage license server operations — for example, running reports, performing audits, configuring alerts, and adjusting the schedule and parameters of automated administration tasks.
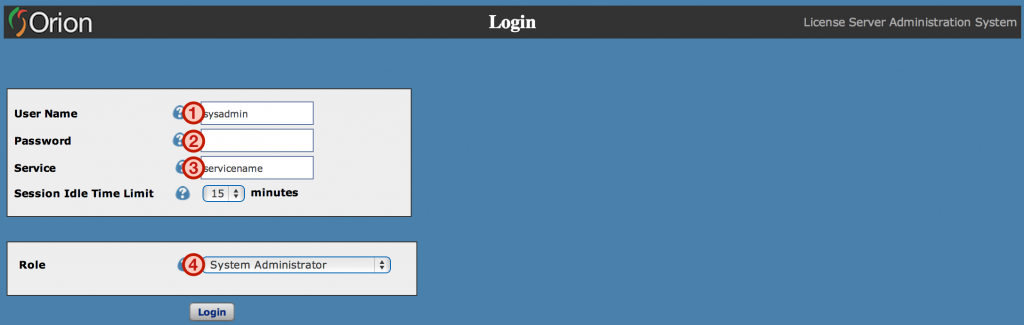
Each field of the login screen:
- Username: The username is always sysadmin. This account has the System Administrator role, which lets you manage all aspects of your license server — including adding products, domains, and users, and creating subordinate Product License Administrator and Domain User Administrator accounts. The subordinate roles have restricted privileges, described in the License Administration User Guide.
- Your password was set when your license server was provisioned.
- The Service name was set when your license server was provisioned.
- The Role defaults to System Administrator, which is what you want here. Product and Domain administrators select the appropriate role and supply the corresponding product and domain parameters before logging in.
Orion Administration User Interface Home Screen
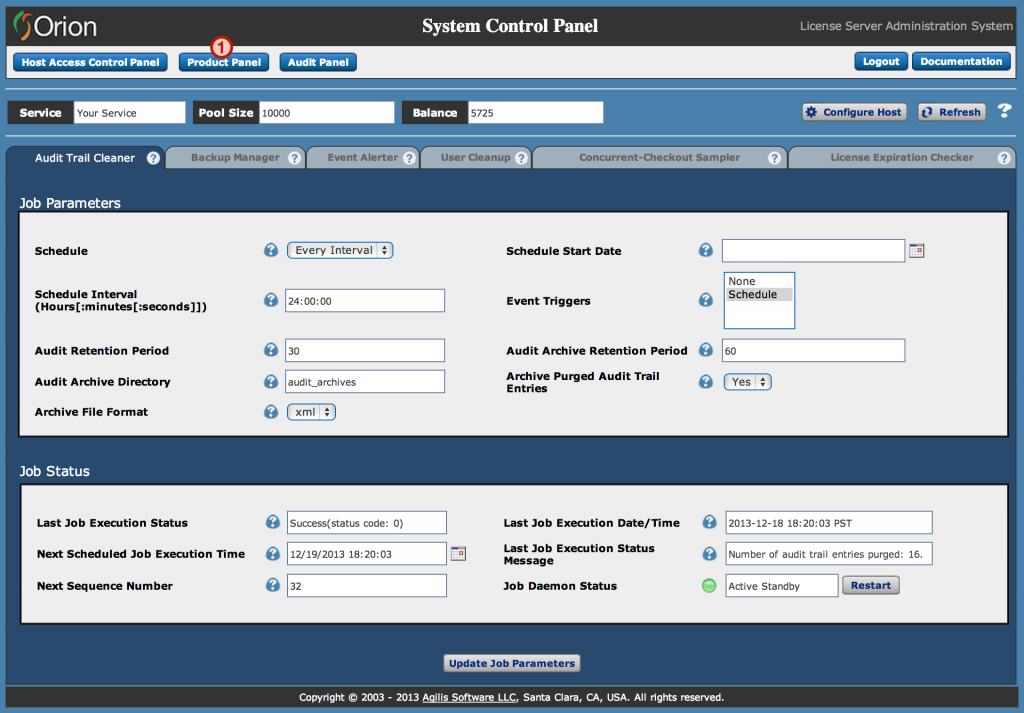
When you log in with the system administrator role, the home screen is displayed. For now, skip to the Product Panel (1) to add your first product. Click the ‘Product Panel’ button.
Products
The Products section of the administration UI has three main areas. Explore each below.
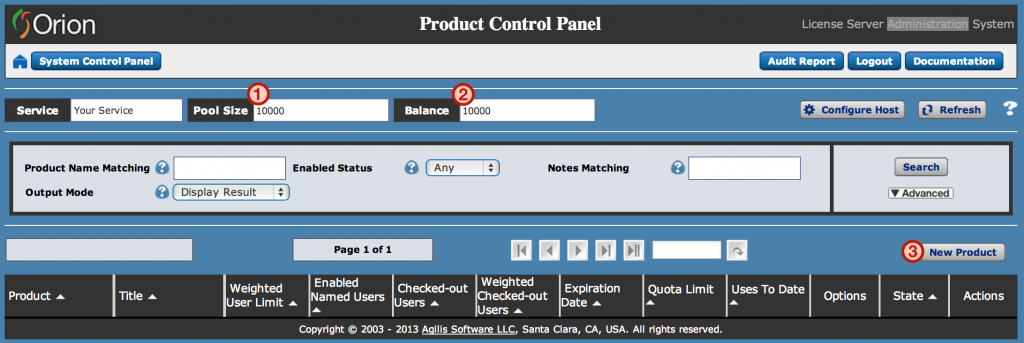
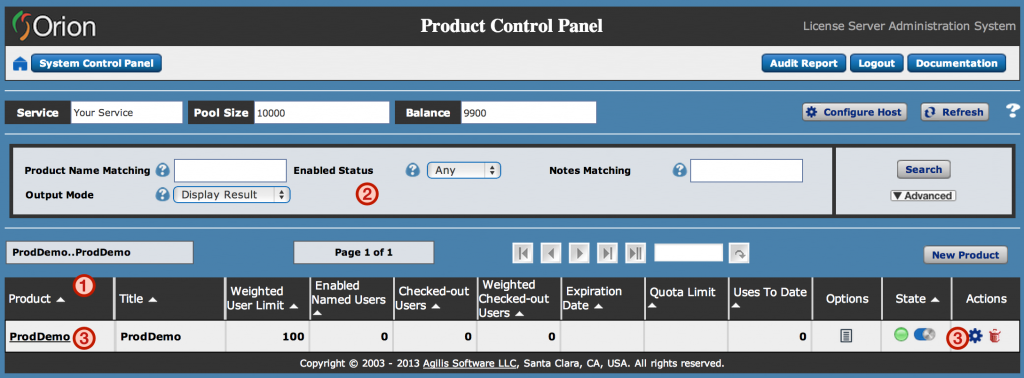
Product Control Panel
The Product Control Panel is where a System Administrator views, manages, adds, and deletes licensed products. Key areas:
- Pool Size – The upper limit on Concurrent Active User Licenses in your account. The pool can be distributed across multiple products, and further across multiple domains. As an Orion customer, your Pool Size has no preset limit.
- Balance – Before you create any products, this value equals your Pool Size. As you create products and assign user limits, the available balance decreases. Available Balance plus the assigned Weighted User Limits always equals the Pool Size.
- New Product – You start with no products. Create your first with the ‘New Product’ button on the right side of the screen.
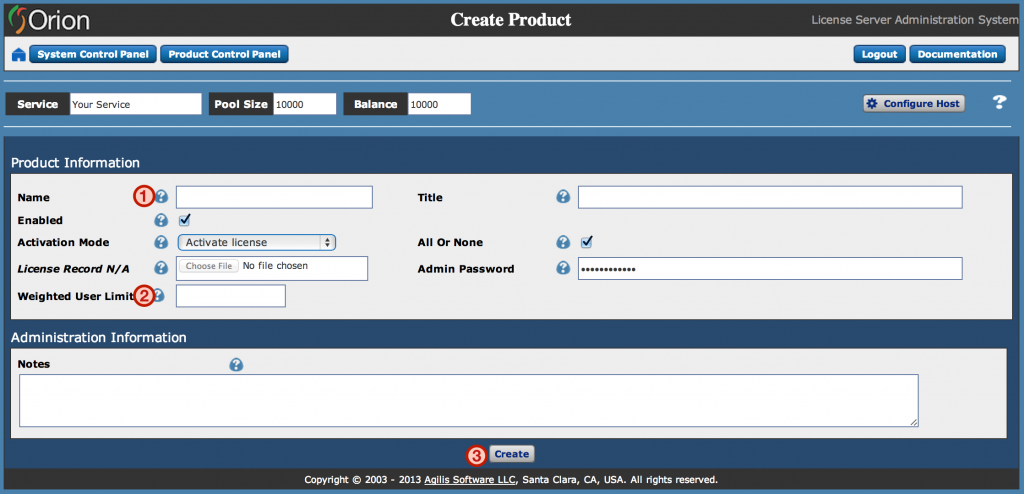
Create Product
Clicking ‘New Product’ takes you to the Create Product page. At a minimum, specify (1) Name and (2) Weighted User Limit. The Weighted User Limit must be less than or equal to the Available Balance shown at the top of the screen. Leave the other defaults as-is for now, then click ‘Create’ at the bottom (3).
After the product is created, you return to the Product Control Panel.
- The column data provides you with an overview of each product’s status so you can see current license usage at a glance.
- If your product list is long, use the search functionality to find a specific product or set of products.
- Click the Product Name (or the gear icon) to view and edit the Product Details.
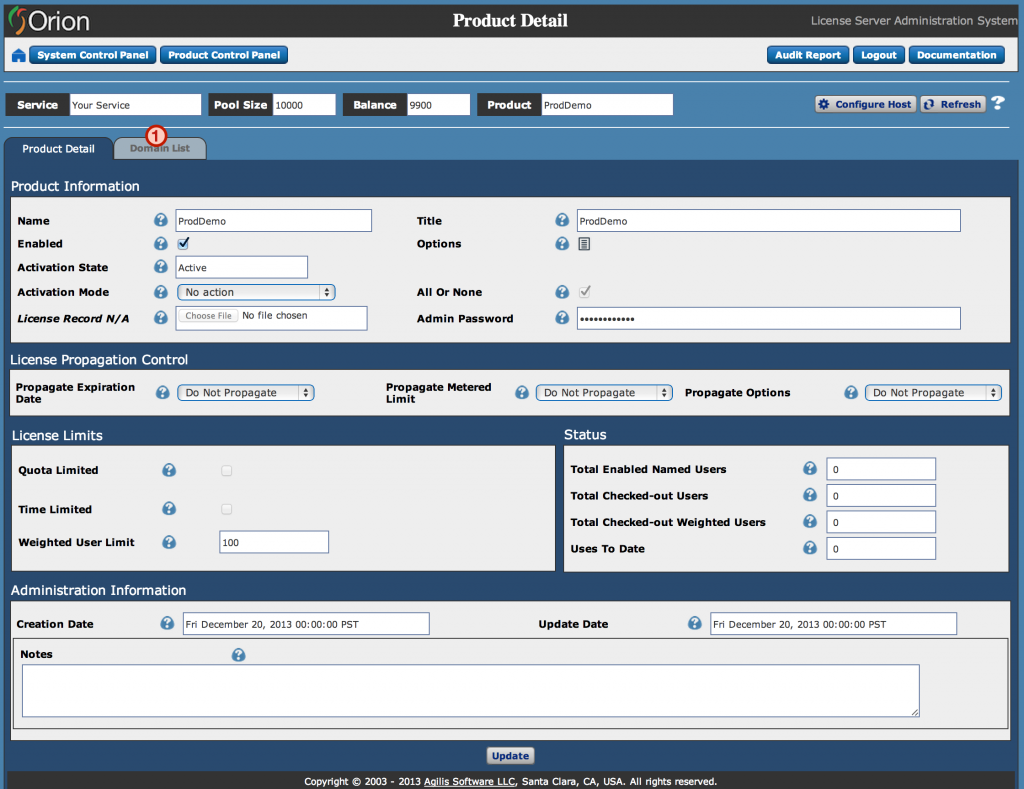
Product Detail
The Product Detail page shows the product’s options, status, and settings, and is where you modify them. Product License Administrators land on this page when they log in. To see the domains associated with the product, click the ‘Domain List’ tab (1).
Domains
The Domain Control Panel has three main areas. Explore each below.
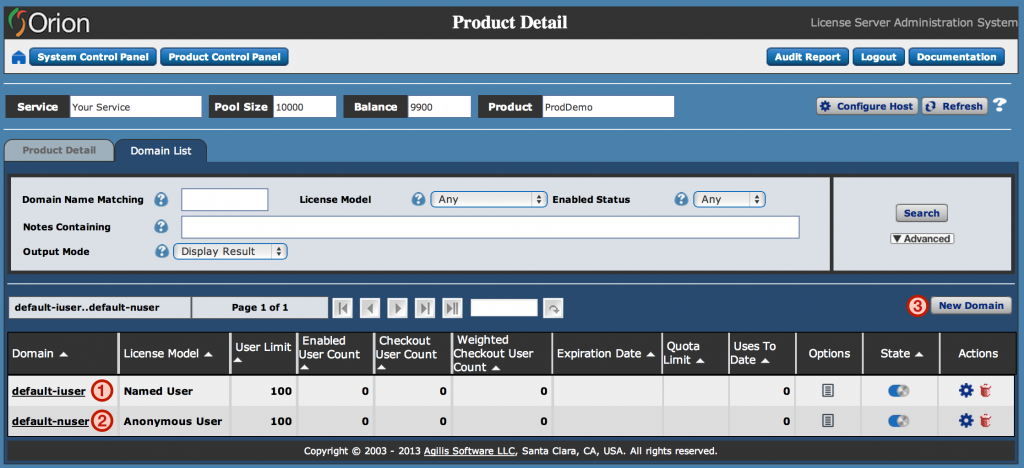
Domain List
Domains help you manage different user types and groups. License limits and options can be set independently at the domain level. For example, use domains to distinguish customer accounts with different user limits, or to carve out a time-limited trial group. Creating a product also creates two default domains: a named-user domain called ‘default-iuser’ and an anonymous-user domain called ‘default-nuser’. If your needs are basic, these defaults are enough — you don’t need to create custom domains.
An anonymous domain is useful when managing licensing at the organization or group level — for example, a floating license model with a maximum number of concurrent anonymous users. A named-user domain is useful for scenarios including product activation and password-authenticated floating licensing.
For more on domains, see the ‘License Service Data Model’ section of the Orion Server Documentation. For more on licensing models, see the ‘Overview of Network Licensing Models’ section of the appropriate client SDK documentation.
To create a custom domain, click the ‘New Domain’ button (3) on the right side of the screen.
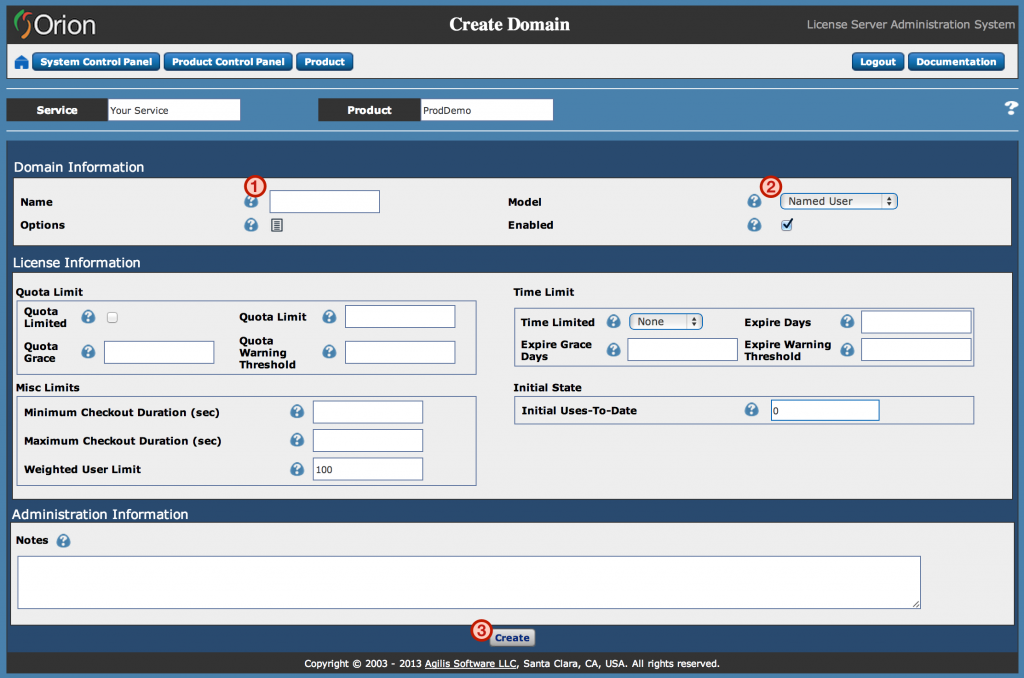
Create Domain
Clicking ‘New Domain’ takes you to the Create Domain page. At a minimum, specify (1) Name. The default Model is ‘Named User’ (2), which is fine here. Leave the other defaults as-is — the new domain inherits limits from its containing product. Click ‘Create’ at the bottom (3).
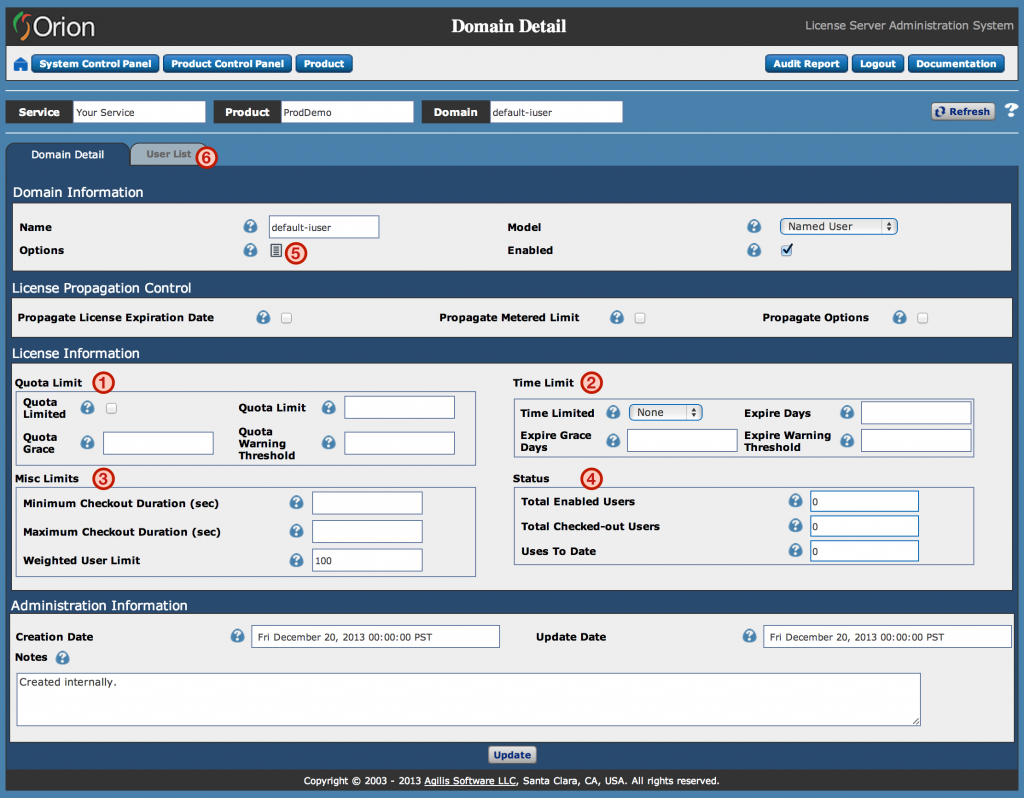
Domain Detail
The Domain Detail page shows the domain’s options, status, and settings, and is where you modify them.
- Quota Limit – Use this area to view and update the domain’s quota limit settings. Quota (usage) limiting lets you manage and track the actual usage of a product or specific features.
- Time Limit – Use this area to view and update the domain’s time limit settings. Useful for trial, subscription, or other time-limited licensing scenarios.
- Misc Limits – Use this area to view and update miscellaneous limits for the domain: checkout duration and weighted user limit.
- Status – Shows the current domain usage. Reset the Uses To Date field if needed.
- Options – Click the ‘Options’ icon to view, add, or edit user-defined options. Your application reads these options via the “feature checkout” runtime mechanism, which lets you enable or restrict features at checkout time based on whether an option evaluates to true. For more, see ‘Feature License’ under ‘Concepts > Key Concepts > Licensing Semantics’ in the Orion Server Documentation.
- User List – Click the ‘User List’ tab (5) to see the users associated with the domain.
Users
The User Control Panel has several areas. Explore each below.
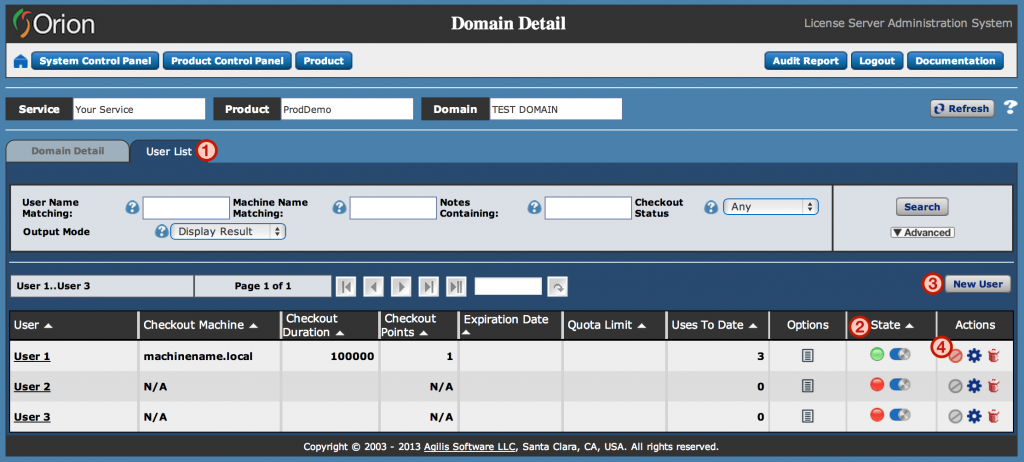
User List
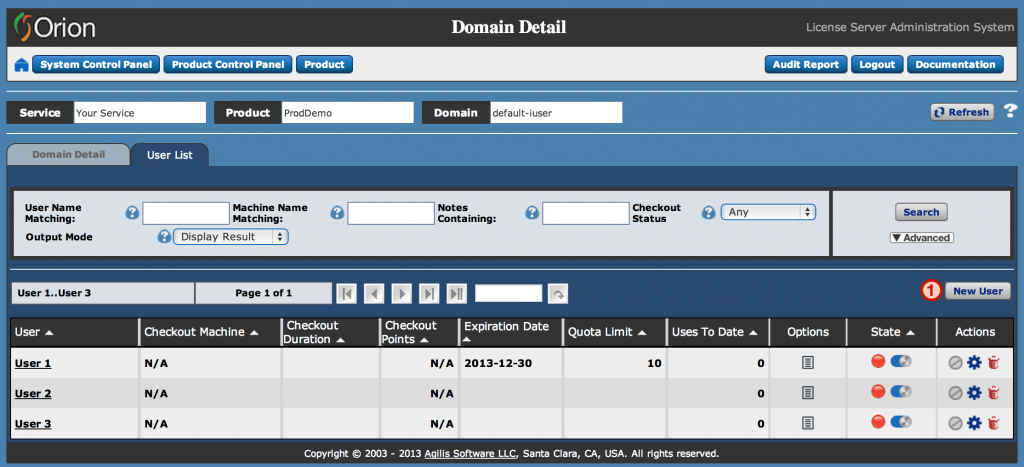
The User List tab shows registered users for a named-user domain, or currently active users for an anonymous-user domain (1). Checkout and user-state details are shown at a high level (2). Create new named users with the ‘New User’ button (3), through the Orion client library, or via back-office integration using the Orion Web Services API.
Canceling A Named-User Checkout
To cancel a named-user checkout directly from the user list, click the ‘cancel checkout’ icon (4) in the Actions column. A green State column indicates an active named-user checkout.
A confirmation pop-up appears. Click ‘OK’.
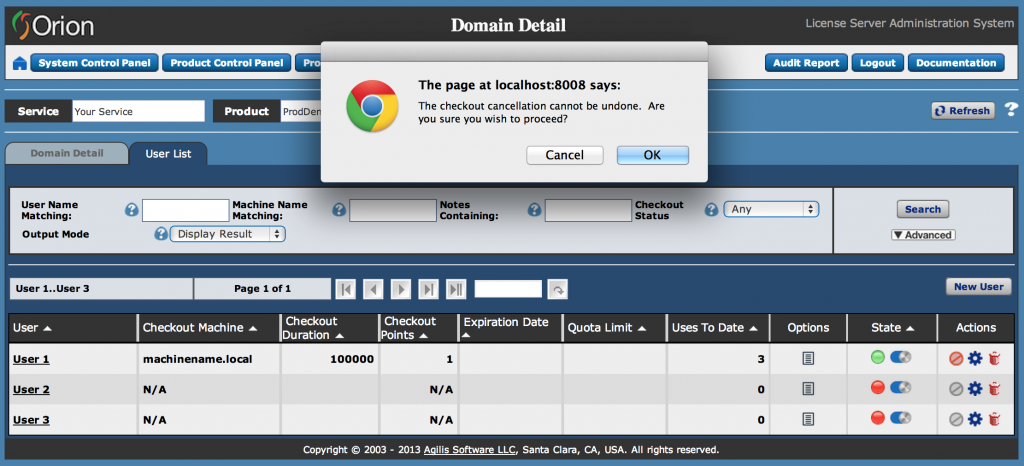
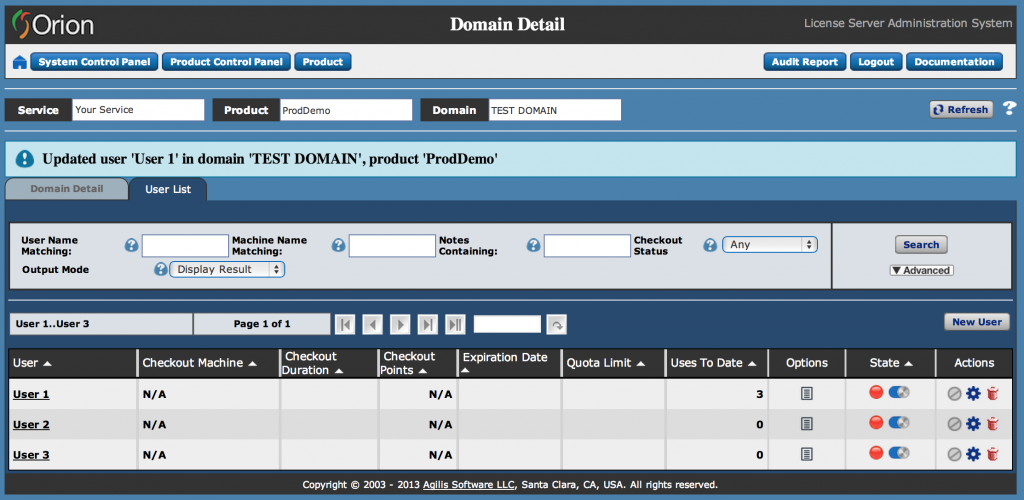
The checkout is canceled. Note that canceling a named-user checkout is different from deleting a named user, which drops the user from the domain entirely (and also cancels the checkout).
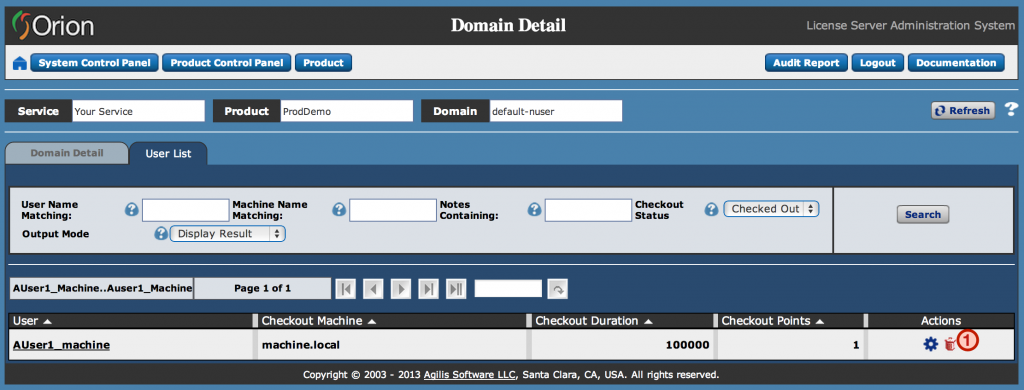
Canceling An Anonymous-User Checkout
To cancel an anonymous-user checkout from the User List, delete the user — click the delete icon (1) in the Actions column.
For more on users, see the ‘License Service Data Model’ section of the Orion Server Documentation. For more on canceling checkouts, see the ‘Administratively Cancelling Checkouts’ section of the License Administration User Guide in the Orion Server Documentation.
For now, click the ‘New User’ button (4) in the named-user domain’s User List to create a new user.
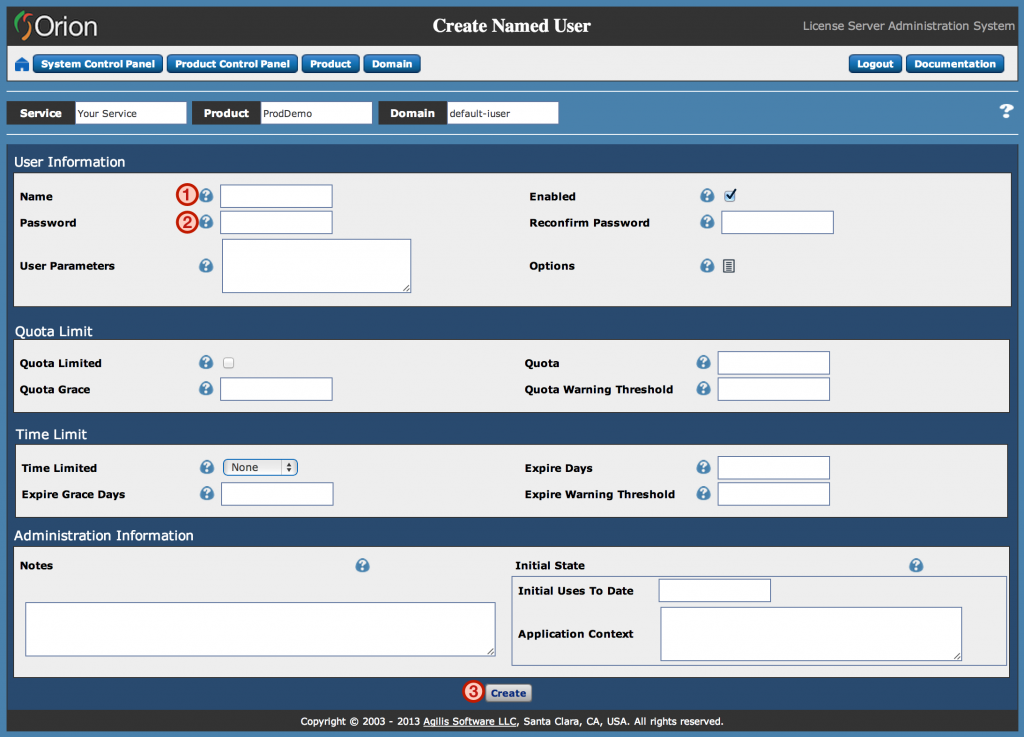
Create User
Clicking ‘New User’ takes you to the Create Named User page. At a minimum, specify (1) name. To require the user to authenticate, supply a password (2). Leave the other defaults as-is — each user inherits settings from its containing domain. Click ‘Create’ at the bottom (3).
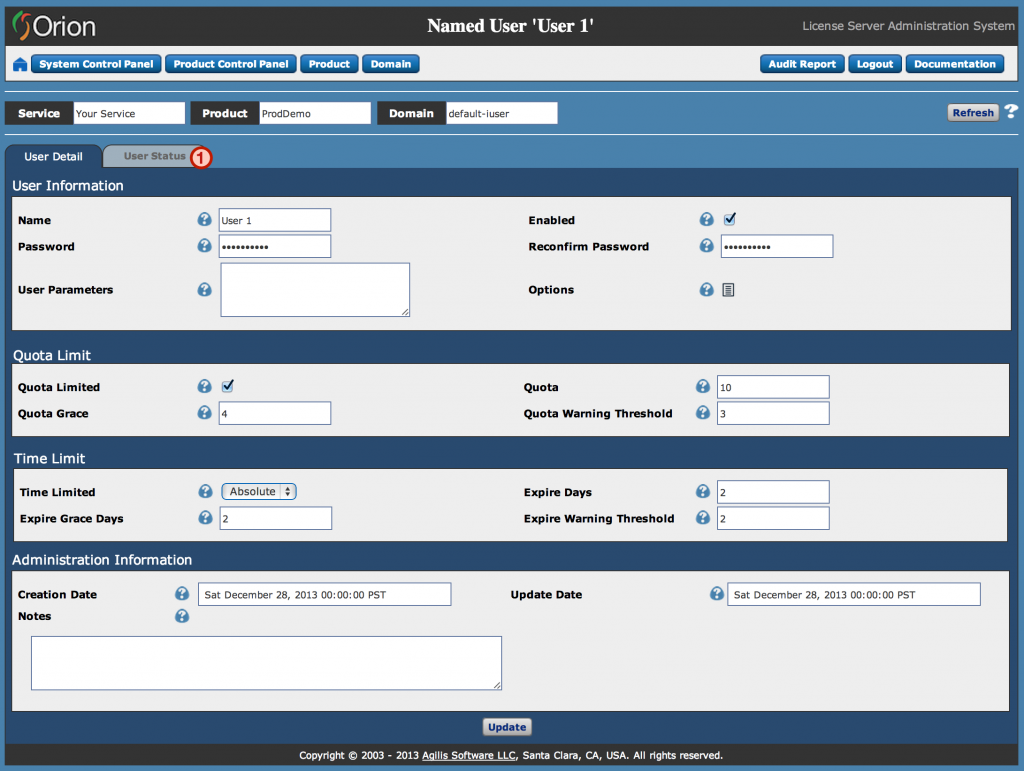
User Detail
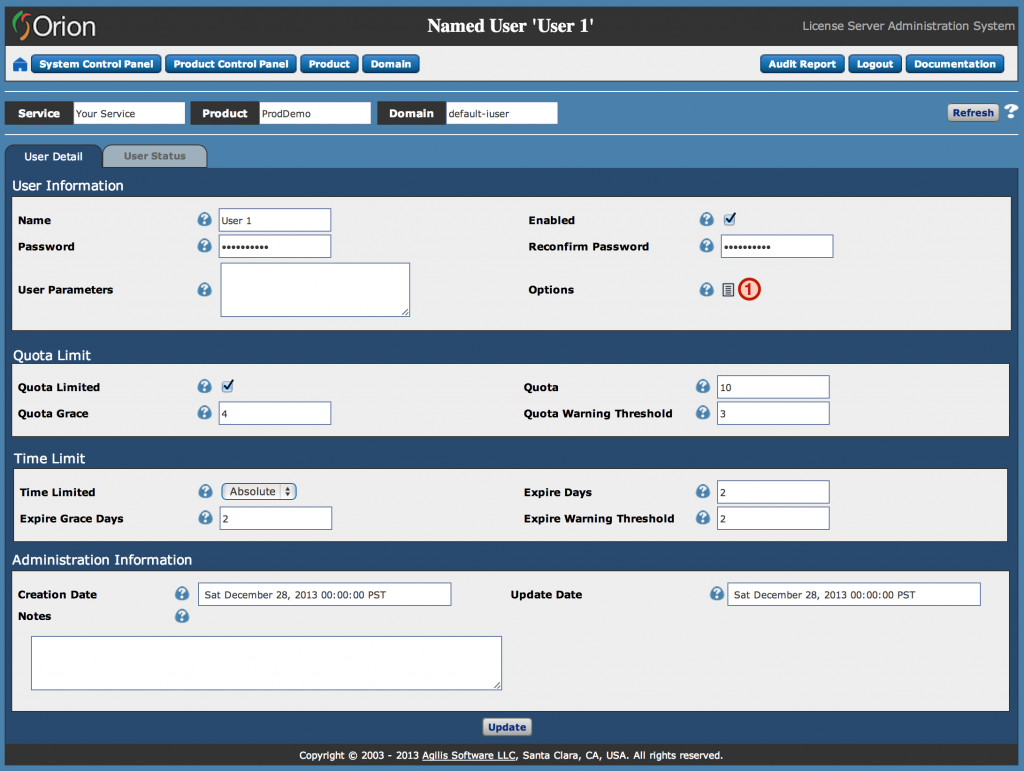
Your newly created user appears in the User List tab. Clicking a user’s name takes you to the User Detail page for that user. The User Detail page shows the user’s options and settings, and is where you modify them — for example, you can set user-specific license limits below the containing domain’s.
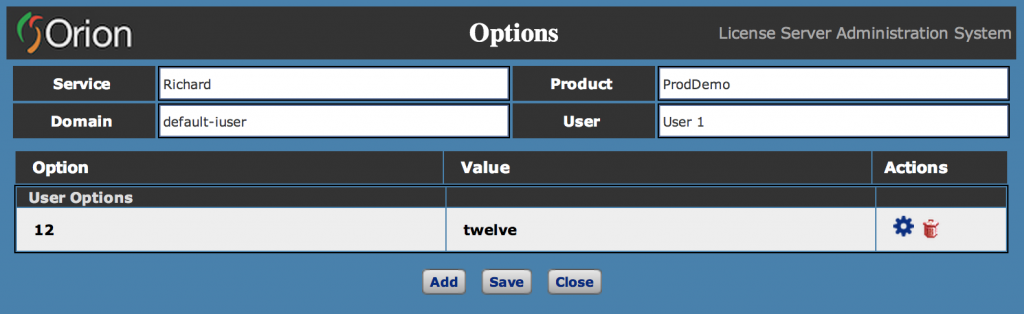
To view, add, or edit user-defined options at the named-user level, click the ‘Options’ icon (1).
The User Options pop-up appears (2). Your application reads these option/value pairs via the “feature checkout” runtime mechanism, which lets you enable or restrict features at checkout time based on whether an option evaluates to true. Because options can be set at the product, domain, and user levels, you have substantial flexibility to configure licensing that meets your business needs. For more, see ‘Feature License’ under ‘Concepts > Key Concepts > Licensing Semantics’ in the Orion Server Documentation.
Click the ‘User Status’ tab (1) to view the user’s current status.
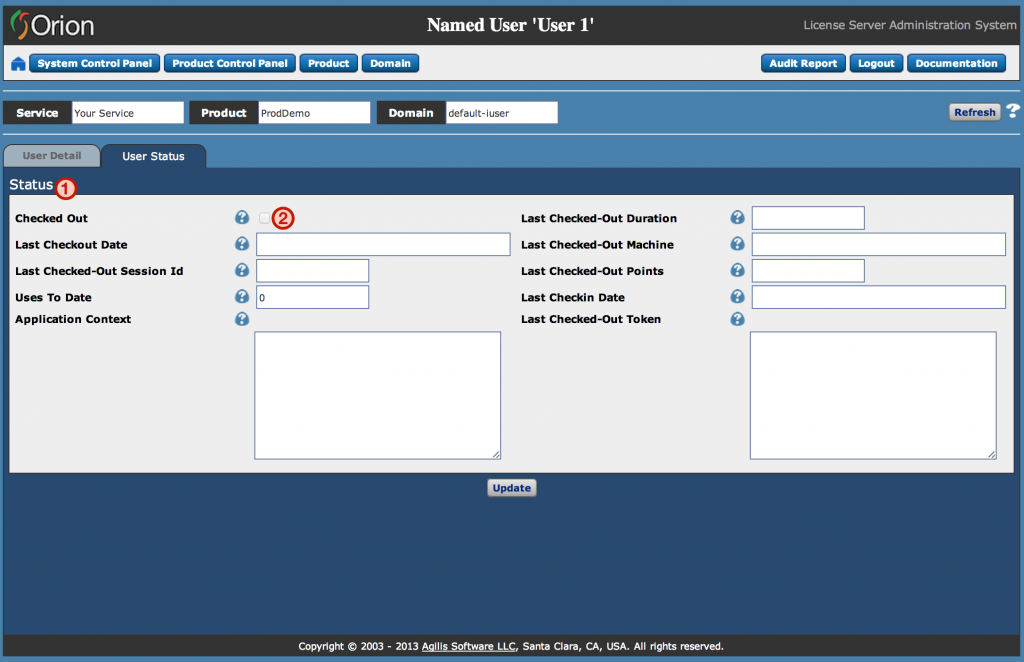
User Status
The User Status tab shows and updates checkout-specific information for the user. Detailed information about the user’s last checkout is available (1). If a user license is currently checked out, it can also be canceled here (2), as an alternative to the User List method described above.
Other Areas
The Orion administration UI has a few other key areas. Explore them below.
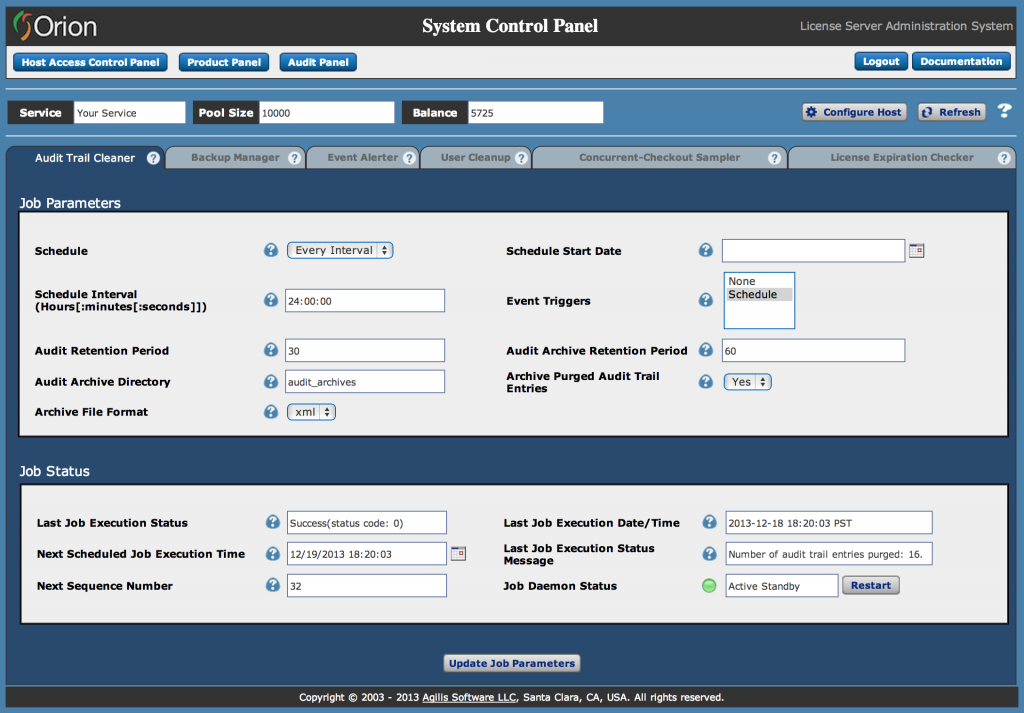
System Control Panel
Orion is designed to require little to no administrative intervention. Its defaults are tuned for 24×7 “lights out” operation. When you do need to review or adjust settings, use the System Control Panel (1). The System Control Panel makes it easy to manage jobs that perform routine tasks such as cleaning up user license checkouts that weren’t checked in properly, triggering email alerts for specific errors or events, and pruning the Audit Trail. For more, see the ‘Job Control System Administration Guide’ chapter in the Orion Server Documentation.
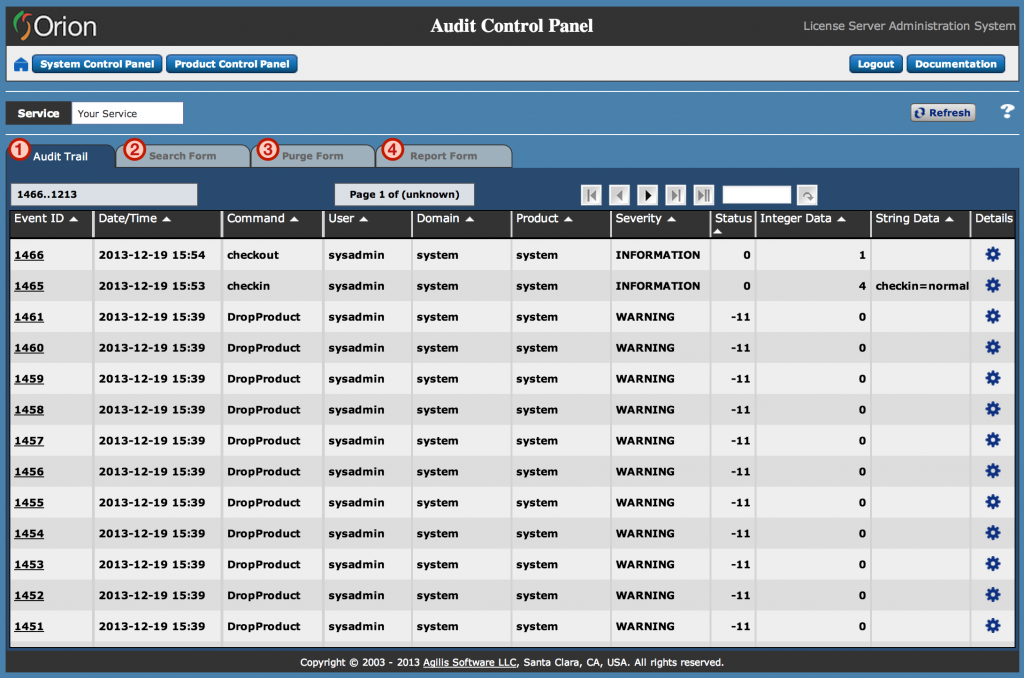
Audit Panel
The Audit Panel has four key areas for viewing and managing the license server Audit Trail:
- Audit Trail – the centerpiece of the Audit Panel. It logs detailed events for nearly all license server activities — logins, checkouts, checkins, product/domain/user creation, deletion, and more.
- Search Form – queries the Audit Trail to filter events by type, time frame, text pattern, and more.
- Purge Form – bulk-purges audit trail events matching specified search criteria.
- Report Form – runs analytics reports on the audit trail.
Miscellaneous
Host Access Control Panel – Define and manage rules that constrain which host machines can access all or specific licenses managed by the license server.
Web Services – Many of the functions available in the Orion Administration UI can also be invoked programmatically via the Orion Web Services API. The API uses HTTP POST commands and returns response data as XML. For more, see the ‘Back Office Integration Guide’ section of the Orion Server Documentation.